Introduction
We specifically chose the Tomei Poncams Stage 1 cam set since it offers such a high lift without having to replace other valvetrain components. They are a direct drop in replacement while at the same provide similar performance to higher lift and longer duration cams that require new valvetrain components.
You should replace the valve cover gasket and the spark plug well gaskets during this install.
-
-
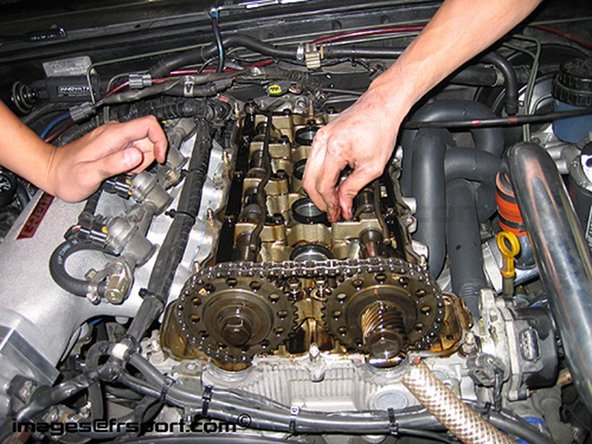
Remove things that are in the way of valve cover. In Figure 1 we removed strut bar, throttle cable, brake booster hose, oil breather hoses, and part of the wiring harness that bolted to valve cover.
-
Remove the valve cover and the timing chain guide.
-
Figure 1- Engine bay before- To loosen sprocket bolts, leave transmission in 5th gear to lock up the engine.
-
Using an extension (or breaker bar), loosen the two sprocket bolts as shown in image 2. Don't remove bolts- just loosen.
-
Put the transmission back into neutral so you can manually turn the crank in the next step.
-
Figure 2- Loosening cam sprocket bolts- Use socket and breaker bar to hand crank the engine until the #1 piston is at TDC.
-
Verify TDC- Crank pulley timing marks should be at 2nd to the left mark while the notches on the exhaust cam sprocket is pointing perpendicular to the surface of the cylinder head
-
Exhaust Cam- 10 o'clock position Intake Cam- 12 o'clock position
-
-
-
Figure 1- Verifying TDC on Compression Stroke.
-
When the engine is in position, put the transmission back into 5th gear to prevent accidental cranking of the engine while replacing the cams.
-
You will need to remove the crank angle sensor.
-
Figure 2- Removing CAS
-
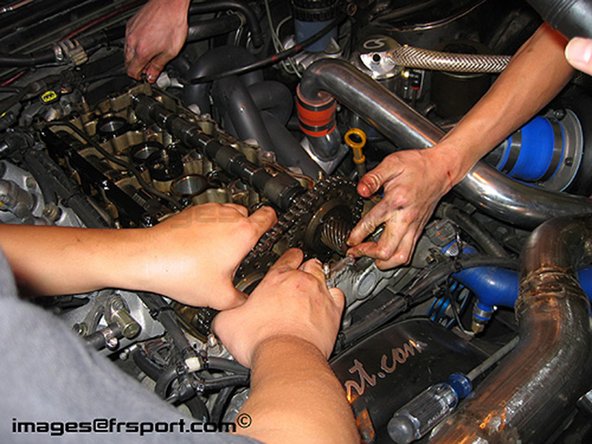
After the crank angle sensor is removed, remove the components on the exhaust camshaft side: cam towers, cam oil squirters, rocker arm stoppers (if installed).
-
All this comes out at once since they are all part of the same assembly.
-
-
-
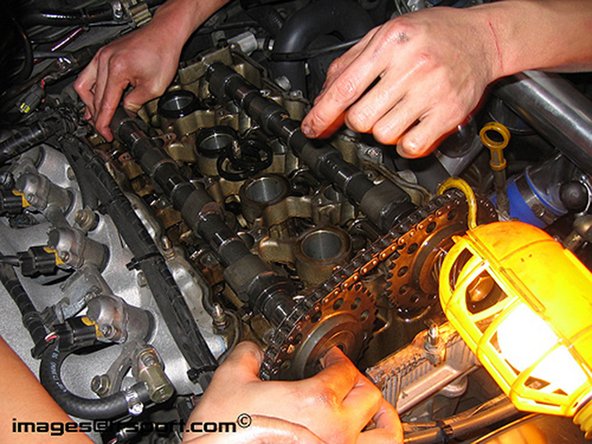
Figure 1- Remove the timing chain tensioner then remove the cam sprocket bolts that you loosened earlier.
-
With an extra set of hands, carefully pull the intake cam sprocket away from the cam while keeping tension on the chain so that it does not jump or skip.
-
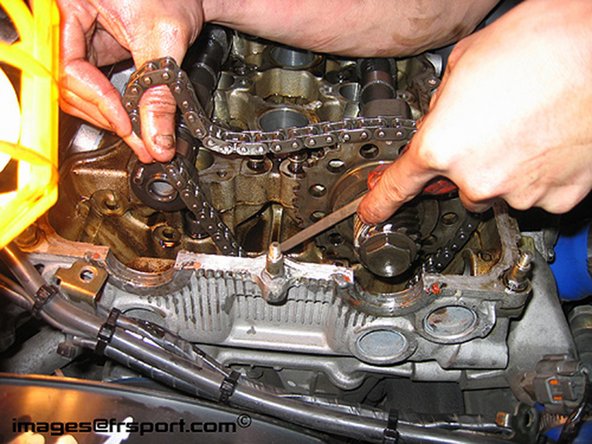
Figure 2- Installing Exhaust Cam- Mark intake cam sprocket and chain's position. Carefully pull the exhaust cam sprocket away from the cam while keeping it tensioned with your hands.
-
Once sprocket is separated from the cam, replace the cam shaft with the Tomei Poncam
-
Figure 2- Rotate the cam until the notch in the front of the cam is oriented in the same direction as the old cam.
-
If done correctly, the sprocket should fit right back on without any issues. Re-install the sprocket bolt and hand screw- do not torque yet. Re-install cam towers for the new cam- do not torque yet.
-
Repeate step 2 for the intake side. Remove and replace the cam.
-
Have someone keep the timing chain tensioned so it just not skip any links/teeths. Carefully remove the intake sprocket from the chain while keeping it tensioned.
-
-
-
Figure 1- Installing the intake cam
-
Figure 2- Guiding the chain back on- Make sure the timing chain is sitting on the chain guide. Re-install the sprocket on the cam.
-
It should almost fit right in. If not, you may have to rotate the cam a few degrees.
-
Warning- Do not rotate the cam degrees from the TDC position as damage to your valves/pistons may occur.
-
After the sprockets and sprocket bolts are on and hand tightened, you need to verify the position of the cams with the crank.
-
Make sure the crank is still at TDC. The cam sprocket nothc should now point at about 10 o'clock and 12 o'clock for the intake and exhaust with respect to the surface of the head.
-
Figure 3- Re-installing intake sprocket with some help.
-
-
-
Figure 1- Here's how the new cams look installed.
-
Push the tensioner back in and use the retainer clip to hold the tensioner in place.
-
Re-install the tensioner. Remove the retainer clip to tension the timing chain.
-
Hand crank the engine SLOWLY to allow the tensioner to fully tension the timing chain.
-
Verify that the engine is still at TDC (check the crank pulley to make sure it's 2nd to left mark).
-
Torque the cam towers, oil squirters, cam sprocket bolts, and rocker arm stoppers if you have them.
-
Remember not to over tighten the cam tower bolts - the torque specs for those are really low. We torqued them to about 7 ft/lbs. Align the crank angle sensor and re-install it.
-
-
-
-
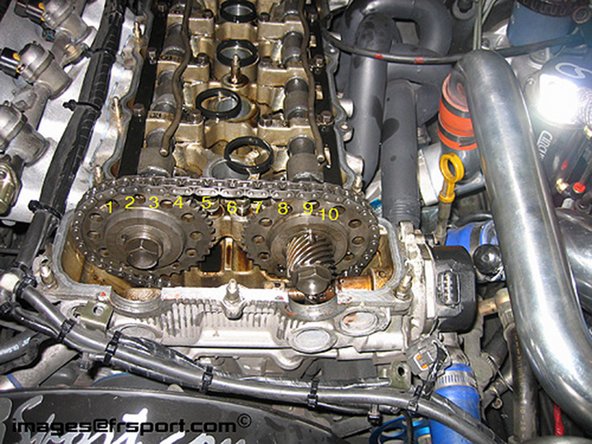
Figure 1- 10 chain links from intake dot to exhaust dot- Valvetrain after everything's re-installed. Notice the number of chain links from the intake sprocket punch mark to the exhaust mark.
-
There are 10 links in between. Also verify that the dowel notch on the sprocket is pointing at about 10 o'clock and 12 o'clock for the intake and exhaust side
-
The cam and sprockets should be in the exact same position as shown in Fig. 2b
-
If there isn't exactly 10 links or if the position is off, you will need to re-adjust the sprockets and cams to get it perfect. Do not proceed to the next step unless you are sure the cams are lined up correctly.
-
Pour some fresh oil over the newly installed cams. Put the transmission in neutral.
-
Using a ratchet, hand crank the engine carefully to make sure the cams are installed correctly.
-
If you feel any resistance (ie, the engine won't crank), STOP and double check everything again.
-
Once you are able to rotate the engine a few times, you can re-install everything.
-
-
-
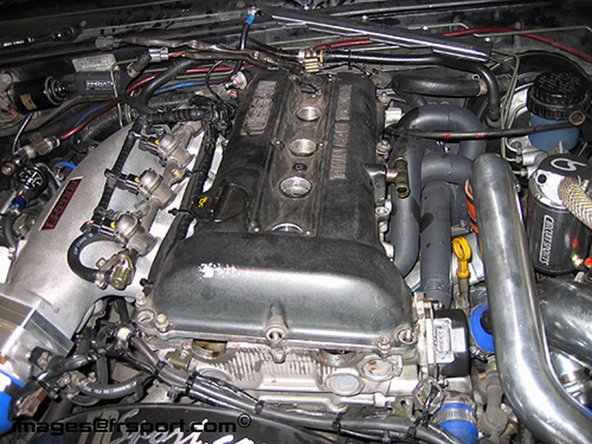
Figure 1- All back together
-
Now for the good stuff- The Results!
-
Because the vehicle is using MAP sensor, we weren't able to take full advantage of the new cams without a minor retune.
-
Using our old tune at the track along with our butt dyno, we noticed that the car pulls much harder from 3,000 RPM all the way up to redline.
-
There was some loss in turbo response and power below that, but the gains made after was much more worth it.
-
The car pulls and pulls up until redline whereas before it would bottom out after about 5,500 RPM.
-
With tuning, the engine should be even more responsive with more mid and high range power
-
Stay tuned for some dyno charts!
-